Docker compose による TwinCAT のデプロイ#
/opt/stacs/TC_XAR_Container_Sample/以下にあるdocker-compose.yamlファイルを編集します。
これをベースに次の修正を行います。
docker-compose.yaml の編集#
TwinCATインスタンスを2つ定義する#
2つのインスタンスを作成するため、SERVICESセクション以下のtc31-xar-baseを、tc31-xar-1とし、 複製してtc31-xar-2を作成します。
container_name, hostnameを差別化し、ネットワークのIPアドレスとAMSNetIDをそれぞれ個別の値を割り当てます。
services:
mosquitto:
    image: eclipse-mosquitto:latest
    :

tc31-xar-1:                         # baseから1への名称変更
    image: tc31-xar-base:latest
    container_name: tc31-xar-1     # 名称変更
    hostname: tc31-xar-1         # 名称変更
    :
    networks:
    container-network:
        ipv4_address: 192.168.20.3
    :
    environment:
    #- PCI_DEVICES=NONE
    - AMS_NETID=15.15.15.15.1.1
    :
tc31-xar-2:
    image: tc31-xar-base:latest
    container_name: tc31-xar-2
    hostname: tc31-xar-2
    :
    networks:
    container-network:
        ipv4_address: 192.168.20.4
    :
    environment:
    #- PCI_DEVICES=NONE
    - AMS_NETID=15.15.15.16.1.1
永続化ボリューム設定#
TwinCATにてActive Configurationを行うと、ランタイムイメージが/etc/TwinCAT/3.1上に作成されます。この場所をホストOS上のストレージに展開するため、それぞれのコンテナ用にxar1data,xar2dataという名前のボリュームを作成します。(リスト 1.19)
これを行わないとメモリ上にデータが作成されますので、再起動するとランタイムイメージは消滅してしまいます。
services:
    :
tc31-xar-1:
    :
    volumes:
    - xar1data:/etc/TwinCAT/3.1

tc31-xar-2:
    :
    volumes:
    - xar2data:/etc/TwinCAT/3.1

volumes:
   xar1data:
   xar2data:
以上の変更を加えた全体のdocker-compose.yamlをリスト 1.20に掲載します。
networks:
  container-network:
    name: container-network
    ipam:
      driver: default
      config:
        - subnet: 192.168.20.0/24
          gateway: 192.168.20.1

services:
  mosquitto:
    image: eclipse-mosquitto:latest
    container_name: mosquitto
    hostname: mosquitto
    ports:
      - "1883:1883"
    restart: unless-stopped
    volumes:
      - ./simple-mosquitto.conf:/mosquitto/config/mosquitto.conf:ro
    networks:
      container-network:
        ipv4_address: 192.168.20.2

  tc31-xar-1:
    image: tc31-xar-base:latest
    container_name: tc31-xar-1          # 名称変更
    hostname: tc31-xar-1             # 名称変更
    restart: unless-stopped
    depends_on:
      - mosquitto
    privileged: true
    volumes:
      - /dev/hugepages:/dev/hugepages:rw
      - xar1data:/etc/TwinCAT/3.1               # 追加
    networks:
      container-network:
        ipv4_address: 192.168.20.3
    # Use PCI_DEVICES as environment variables to specify the Ethernet
    # controllers which can be used by the TwinCAT runtime for real-time
    # ethernet communication.
    # If PCI_DEVICES is not provided at all, TwinCAT will probe all
    # available Ethernet controllers of the host for real-time ethernet communication.
    # If PCI_DEVICES is set to NONE, the TwinCAT runtime won't use probe
    # any PCI Ethernet controller for real-time ethernet communicaion.
    # Set PCI_DEVICES to a space seperated list of PCI slot address
    # to explicitly set Ethernet controllers for real-time ethernet communication.
    # Run `sudo TcRteInstall -l` on the host to get a list of available
    # Ethernet controllers and their PCI slot address
    # Examples:
    #  #- PCI_DEVICES=NONE
    #  - PCI_DEVICES=NONE
    #  - PCI_DEVICES=0000:02:00.0
    #  - PCI_DEVICES=0000:04:00.0 0000:03:00.0
    environment:
      #- PCI_DEVICES=NONE
      - AMS_NETID=15.15.15.15.1.1

  tc31-xar-2:
    image: tc31-xar-base:latest
    container_name: tc31-xar-2          # 名称変更
    hostname: tc31-xar-2             # 名称変更
    restart: unless-stopped
    depends_on:
      - mosquitto
    privileged: true
    volumes:
      - /dev/hugepages:/dev/hugepages:rw
      - xar2data:/etc/TwinCAT/3.1               # 追加
    networks:
      container-network:
        ipv4_address: 192.168.20.4
    # Use PCI_DEVICES as environment variables to specify the Ethernet
    # controllers which can be used by the TwinCAT runtime for real-time
    # ethernet communication.
    # If PCI_DEVICES is not provided at all, TwinCAT will probe all
    # available Ethernet controllers of the host for real-time ethernet communication.
    # If PCI_DEVICES is set to NONE, the TwinCAT runtime won't use probe
    # any PCI Ethernet controller for real-time ethernet communicaion.
    # Set PCI_DEVICES to a space seperated list of PCI slot address
    # to explicitly set Ethernet controllers for real-time ethernet communication.
    # Run `sudo TcRteInstall -l` on the host to get a list of available
    # Ethernet controllers and their PCI slot address
    # Examples:
    #  #- PCI_DEVICES=NONE
    #  - PCI_DEVICES=NONE
    #  - PCI_DEVICES=0000:02:00.0
    #  - PCI_DEVICES=0000:04:00.0 0000:03:00.0
    environment:
      #- PCI_DEVICES=NONE
      - AMS_NETID=15.15.15.16.1.1

volumes:         # このブロック追加
   xar1data:
   xar2data:
リアルタイムネットワークドライバのコンテナへの割当#
ホスト側のTwinCATサービスを停止し、イーサネットカードを開放します。
$ sudo systemctl disable --now TcSystemServiceUm
リアルタイムイーサネットインターフェースカードへvfio-pciドライバの適用リアルタイムイーサネット通信には、PCIベースのネットワークデバイス向けにvfio-pciドライバが必要です。コマンドラインツールTcRteInstallを使用して、IPCのネットワークデバイスにvfio-pciドライバを割り当ててください。
まず、適用可能なネットワークPCIデバイスを
TcRteInstall -lコマンドで一覧します。$ sudo TcRteInstall -l +------+------------+----------------------+----------------+------------+------------+------------------------------------+------------+ | No | Name | MAC | Location | Driver | Override | Model | Link | +------+------------+----------------------+----------------+------------+------------+------------------------------------+------------+ | 0 | enp2s0 | 00:01:05:45:43:fb | 0000:02:00.0 | igb | [-] | I210 Gigabit Network Connection | up | | 1 | enp1s0 | 00:01:05:45:43:fa | 0000:01:00.0 | igb | [-] | I210 Gigabit Network Connection | up | +------+------------+----------------------+----------------+------------+------------+------------------------------------+------------+
このうち、
Location列に見られるPCIスロット番号を指定し、次のコマンドを発行してコンテナで使用可能な状態にします。たとえば、enp2s0のカードにvfio-pciドライバを適用する場合、Locationには、0000:02:00.0とあるため、$ sudo TcRteInstall -b 0000:02:00.0
とします。vfio-pciドライバを適用する場合は
-bを、解除するには、-uを指定します。再度確認します。$ sudo TcRteInstall -l +------+------------+----------------------+----------------+------------+------------+------------------------------------+------------+ | No | Name | MAC | Location | Driver | Override | Model | Link | +------+------------+----------------------+----------------+------------+------------+------------------------------------+------------+ | 0 | enp2s0 | unknown | 0000:02:00.0 | vfio-pci | [*] | I210 Gigabit Network Connection | up | | 1 | enp1s0 | 00:01:05:45:43:fa | 0000:01:00.0 | igb | [-] | I210 Gigabit Network Connection | up | +------+------------+----------------------+----------------+------------+------------+------------------------------------+------------+
このように、
enp2s0がigbではなく、vfio-pciに切り替わっていることがわかります。危険
XAEや通常のEthernetに用いるネットワークカードを指定しないでください。Linux OSのネットワークスタックにおける通信が一切できなくなります。
TwinCAT Container の起動とデーモン化#
これまでの設定によりTwinCAT Containerは以下のコマンドで始動させることができます。
$ cd /opt/stacs/TC_XAR_Container_Sample
$ sudo docker compose up -d
[+] Running 4/4
 ✔ Network container-network  Created                                0.2s
 ✔ Container mosquitto        Started                                1.4s
 ✔ Container tc31-xar-1       Started                                2.0s
 ✔ Container tc31-xar-2       Started                                2.1s
$
また、終了するときは次のコマンドを発行します。
$ sudo docker compose down
[+] Running 4/4
 ✔ Container tc31-xar-1       Removed                                1.6s
 ✔ Container tc31-xar-2       Removed                                1.4s
 ✔ Container mosquitto        Removed                                0.7s
 ✔ Network container-network  Removed                                0.4s
$
ボリュームも含めた完全消去
以下のコマンドを発行すると、Docker compose以下の全てのコンテナは即座に停止し、コンテナイメージおよび、TwinCATの永続化データなどのボリュームも含めて全てが削除できます。完全アンインストール時はこのコマンドを実行してください。くれぐれも取扱いにご注意ください。
$ sudo docker compose down --rmi all --volumes --remove-orphans
コンピュータ起動時毎回この操作を行わなければコンテナ起動しません。このため、Linuxのサービス管理機構であるsystemdを用いてサービス化を行います。
まず/etc/systemd/system/以下にtwincat_compose.serviceファイルを新規作成します。(リスト 1.21)
[Unit]
Description=TwinCAT docker-compose service
After=docker.service

[Service]
Type=oneshot
RemainAfterExit=yes
WorkingDirectory=/opt/stacks/TC_XAR_Container_Sample
ExecStart=/usr/bin/docker compose up -d
ExecStop=/usr/bin/docker compose down
TimeoutStartSec=0

[Install]
WantedBy=multi-user.target
その後、次のコマンドで設定を反映します。
$ sudo systemctl daemon-reload
その後、次のコマンドでサービスを起動します。また、enableコマンドを発行しているため、次回再起動時も自動的にTwinCATコンテナが自動的に起動します。
$ sudo systemctl enable --now twincat_compose
TwinCATコンテナを無効化したい場合は、
$ sudo systemctl disable --now twincat_compose
とします。同時に、ホスト側のTwinCATを有効にする場合は、
$ sudo systemctl enable --now TcSystemServiceUm
とします。
接続と試運転#
TwinCAT XAEにてTwinCATプロジェクトを準備します。
XAE側の設定の節にて、事前にADS-over-MQTTで接続する設定を行っていると思います。設定内容を反映するにはSystemManagerServiceの再起動が必要です。PCの再起動により行ってください。
プロジェクトを開き、接続先のタブを確認します。
docker-compose.yamlで設定したhostaname:で定義した名称およびAmsNetIdが一覧されています。接続するターゲットを選び、Active ConfigurationおよびRUNモードへの移行をおこなってください。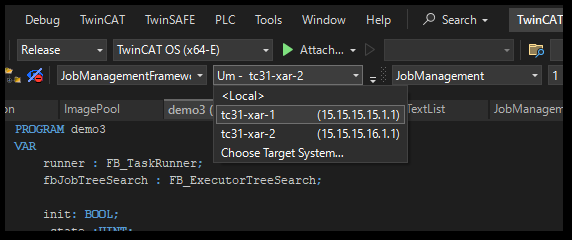
RUNモード、および、PLCスタートを行ってください。
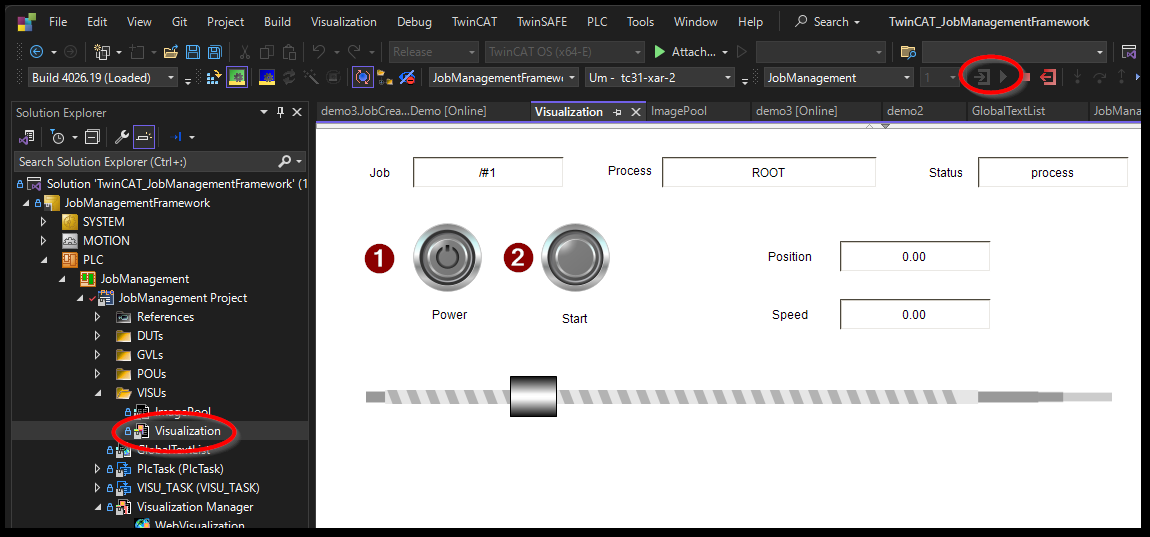
PLC > JobManagement > JobManagement Project > VISUs > Visualization をダブルクリックしてHMIのシミュレーション画面を表示させます。
Powerボタンの続き、Startボタンを押すと、シーケンスが動作します。